

How To Draw Nightmare From Metroid Fusion
Metroid Fusion 1% Run
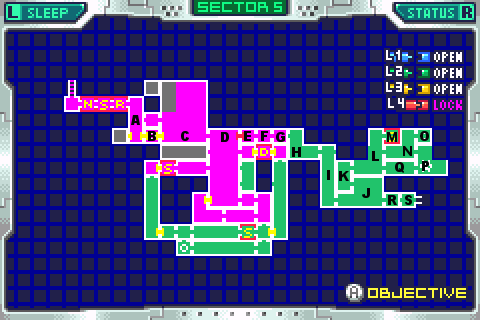
Behold the mighty reference map, and all it'southward celebrity.
Nightmare
Hither he is. The biggest of the large. The worst of the worst. The legendary biggest pain in the neck for anyone who'due south e'er tried a i% game.
The KING of the Terrible Trio of bosses. Yakuza is random to the max and a major bother for 1%ers, Nettori is either tricky or terribly time consuming with only 15 missiles, but nightmare beats them both out. This swain is merely non 1% friendly no matter how yous piece it.
In fact, this fellow is Particularly unfriendly to someone doing a no-hitting game. It's very piece of cake to go into positions where yous have no fashion out and become it. The dude is massive. Just outright MASSIVE.
Merely I'll go into that in a little bit. First
M: The terminal fourth dimension we'll take to run across Mustard Samus load. Thank goodness.
Fifty: Landing is bad
N: Time on the ground is faster than time in the air. What is this, back to basics? You know all this already I'1000 sure.
See how I grabbed onto the ledge subsequently only 1 mid-air bound? That takes a very efficient infinite jump to do, I made sure I did that for the segment though. Zero is also good for you guys.
And death to boss door. He was very cooperative, I must say I'm impressed. And no need to stop and refill as nosotros have all our missiles.
O: Don't grab the east-tank. crumble and rumble
P: P is for pest, which is Nightmare all over.
Alright, the get-go thing we need to talk about is how freaky crazy nightmare's damage zones are.
Remember Nettori? The bodily "hurtz" function of nettori was this little rectangle which was much smaller than the sprite for the guy. Nightmare is more complicated, and really freakish with his damage zones.
I'thousand not going to bother taking precice measurements, as I'm lazy, but lemme half-donkey up a quick diagram for yous, equally it'south easier than describing:
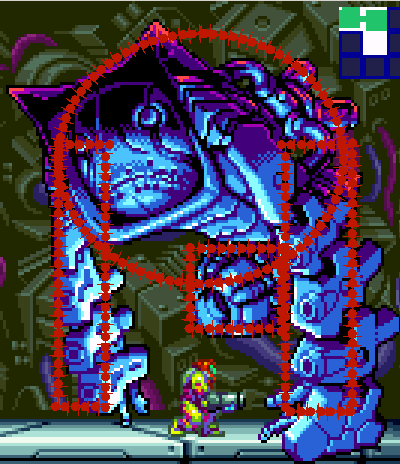
And here nosotros have a close up of ole ugly.
This is a full general approximation of what's going on with the fellow. Cross a red line and yous become hit. Every bit y'all can see, information technology only barely matches up with his sprite. And don't eastward-mail me telling me how the circle isn't loftier enough or the arm is too wide, this is a 10-second approximation to give you an thought, not a precice map of the fellow.
As yous can encounter nightmare has invisible pieces that will hurt you as well as pieces which you lot can see just don't actually exist.
Having a general knowledge of how he's shaped volition help immensely in fighting the fellow while avoiding damage. Knowing for instance that y'all can pass through that left pointy thing on top of him all y'all want, only yous don't want to go anywhere near the top one. And knowing that his dorsum is larger than information technology appears. So on and and then forth.
But the most relevent thing that comes out of this is that left arm. (our left, non his)
find just how much of it isn't actually in that location. Too discover that his armpit has a kind of condom zone. We'll make employ of that in a bit.
Anyhow, now that you lot have an idea of what's going on, let's get on with the video.
Maaaaan, could this guy accept any longer to show upwards?
Alright, nightmare will lose his mask after 5 shots to his brawl. Glad there's no referees around.
Past now you're probably wondering why I face left as he rises and becomes vulnerable. If I had faced right, I would take done full damage to this young man. All 3 plasma shots plus the extra animation virtually the gun.
If I had washed full harm, he would have immediately gone into gravity mode afterwards just i shot. And he's take 4 more to come up out of it.
However, since I just practise a little damage to him with my first shot, he goes into gravity mode on shot 2. And so he simply takes 3 more than shots to lose his mask.
A lot of stuff works out meliorate if you practise it this way. A big one is that his lasers won't striking you when y'all're morphed and hiding in his armpit, which they kind of tend to practise if you lot exercise the 'gravity mode in one shot' route.
Anyways, aye, kneeling his ball won't hit you, and you tin can accept that 2d shot to him when he goes support. Gotta be careful non to stand too early though, obviously.
Every bit far as weird gravity mode goes, one needs to leap up to the ball to do full damage to it, but it takes a loooong time to bound while gravity is wiggy, so jump way early to become there in time to release a charged beam.
In one case the tertiary shot is fired and his brawl is flashing, he's going to lose his mask. Just not before he tries to beat me. But using our newfound noesis of his zones, we can morph and hide in his armpit. Isn't that great?
Remember, a lot of that arm isn't really in that location, so it's a adept haven. Only stay abroad from that flashing ball.
Then at some indicate he'll decide to actually come out of that phase. At this indicate we land on the ladder, hanging on every bit low as we're able (don't worry, I don't think his lasers tin hit yous no matter how depression you are on the ladder).
Look a couple seconds after he explodes, then release a charge and all your missiles into his face. With proper practice and timing ane can get the beams to striking right every bit his mask goes.
Ugh, I kind of wish the mask stayed on.
If you missile quickly, at that place'southward enough time left over to accuse your beam and release a full damage into his fugly mug. Retrieve, that left spike isn't there, so y'all have plenty of room to climb the ladder and spring away even if it seems like he's about to vanquish you.
We're most washed! Kind of.
Actually now's where the Real nightmare fight begins. I call this his assy phase. This is when he just bloats around trying to shove you with his ass.
Seriously the guy is simply apparently beefy, and tin turn on a dime unless he'south got a lot of momentum going.
Alright, when the mask comes off he'll either motility upwardly or down at you lot. I don't know if this is random or depends on your movements, considering for me he seriously favored moving down.
Now, as you probably are aware, during this phase nightmare'south only attack consists of flight around the room trying to striking you. Where and how he moves depends on how yous do. He's basically a real ugly mega-x who has weird damage zones and a tiny weak spot.
There's one exception to this, sometimes nightmare will stop in his tracks and start shooting you lot.
This is a very important thing, for it makes him a sitting duck. It's much easier to hit something that's not moving, as if I had to say it.
One of the great questions of the ages is just what exactly causes nightmare to stop. Well afterward much written report I can finally say... I'thou not sure...
It definitely depends on your movements. The aforementioned set of movements were able to yield the same results, just every bit with mega ten. There seems to exist a kind of... spot... that's nice for him to be in, and if you're left and a flake down of him, he'll stop at that place. Also information technology seems to exist good if he'due south not off screen or about to go off screen. That seems to exist about it.
In any effect, I plant some movements that work really well, as the video will evidence.
Both times (subsequently his initial mask accident up and after the get-go end) he decided to move down at me, but the premise is the aforementioned for moving upwards. Draw his movements to get him to that general area while you likewise are in the full general surface area I was in. If y'all'll look, that was kind of the spot he was in when he lost his mask in the get-go identify. I don't know if that's casual or not, but it seems a expert thing.
Alright, I pump a looot of total damage charges into him while he'due south standing even so. And his face gets squishier and squishier.
U-G-L-Y you ain't got no excuse y'all ugly
Once again, keep in heed what's in that location and what's not when dancing around. Y'all can get pretty close to that face as the rim and fasten aren't in that location, simply don't touch the actual face up (or empty space where the face used to be)
In fact, even when his confront is all squishy and cherry and small, you can nevertheless fire into the empty infinite where his face used to be and deal all the impairment to him.
Then he starts with the assy stage again, then I draw him into practically the verbal same spot and he stops again, become effigy, and I kill him.
Now just like BOX, the nightmare will move over to a certain spot on the screen when he dies, so kill him shut to it. I kind of did, but the spot is kind of to the correct and I kind of had to kill him leftish because of the fact that he moves left during his shootings, and information technology's still faster than making him become assy a 3rd time.
And then he loses his arms and things and the cadre-10 appears. A practically perfect nightmare kill in every way.
At this point I was kind of on edge, it was actually the first time I managed to do that without getting hit.
Run into I'1000 out of missiles at present, and when the core-10 appears information technology volition spawn green x'due south for me, merely the problem is they will motion Abroad from me no matter where I am.
Normally I'm downwards and to the left of the cadre x when it appears and the guys move upwardly and correct, then I tried to jump and take advantage of that, but I jumped hella early, and the x's moved upwards and left.
I wasted I guess ii seconds over when I WOULD take gotten my first green x, merely there'south no style to grab them fast in any event, not without risking astringent collisions with the core itself. Overall I don't mind if you don't, and i saved hours on a perfect nightmare fight so a couple seconds hither won't make me lose any sleep.
Too after that boo boo I got really into my zone for the cadre x fight, that was as perfect as nightmare. Sweet.
And that's that, gravity accommodate caused, hurrah!
And we never have to encounter ugly mustard samus again. Now it's yummy grapevine samus. Come across grape for purple and vine for green. ISN'T THAT CLEVER?!?
ahem
Alright, that door on the left is stupid. Nosotros need to build a heave upon leaving, merely if we just run to it we'll hit it and stop.
One must run left to open the door, run right to boost distance, then left again through the open door. Quite retarted, but it must exist done.
Phew, nightmare finished. Quite a show, eh?
At present all that's left is the cleanup.
Q: A-boosting we will go
Fifty: A-boosting we will become
1000: High ho the dario... oh
alright, shine and spark for maximum speeeeedo
J: And to the bottom of the room nosotros go. Now impale the fishes and the pirate there. That same pirate that was a semi-random cistron last time we were in this room is ane again.
If he moved right, he'll shoot at you lot. If left he won't. If he does, kneel and be on your way. This was the case for me, and used a chip of time, simply I won't sweat information technology.
Using the marks on the floor as reference, nosotros motion until we're at heave altitude, and away we go.
R: A-boosting we will go
S: A-boosting nosotros volition go
AQA, what practice you know
A swift bound through the speed boost blocks and shoot some fish and at the save point.
:39 on the clock! Can whatever 1% game boast such a time after nightmare, I enquire you. Thus ends the terrible trio of bosses for 1%. Just BOX, Ridley and the final battle to go. Almost finished!

Source: https://www.metroid2002.com/fusion/23-nightmare.php
Posted by: hubbardwhatefteld.blogspot.com
0 Response to "How To Draw Nightmare From Metroid Fusion"
Post a Comment